![[Kotlin] 하단 내비게이션 개념 및 사용법 - BottomNavigationView, NavGraph, Fragment, FrameLayout - 뉴스앱 만들기 1편](https://img1.daumcdn.net/thumb/R750x0/?scode=mtistory2&fname=https%3A%2F%2Fblog.kakaocdn.net%2Fdna%2FQQSba%2Fbtq7DsbQl0i%2FAAAAAAAAAAAAAAAAAAAAADZCv680E6-8fi2ZkEkUDreTS9H4y_AFe8fcSJMBO1Nj%2Fimg.png%3Fcredential%3DyqXZFxpELC7KVnFOS48ylbz2pIh7yKj8%26expires%3D1780239599%26allow_ip%3D%26allow_referer%3D%26signature%3D0Lenl3kCE4PZv6fz7xKW6QeuLio%253D)
이번 편에서는 NavigationView, NavGraph, Fragment, FrameLayout을 활용하여 하단에 내비게이션 뷰와 버튼 클릭 시 fragment가 바뀌는 방법을 다뤄보겠습니다.
개념
하단 내비게이션을 구현하기전 우리가 사용할 BottomNavigationView, NavGraph, Fragment, FrameLayout 역할들을 먼저 알아보겠습니다.
BottomNavigationView
우리가 화면하단에 만들어줄 메뉴입니다. Activity_main에 구현후, 내비게이션에 들어갈 요소들을 menu에 넣어주겠습니다.

NavGraph
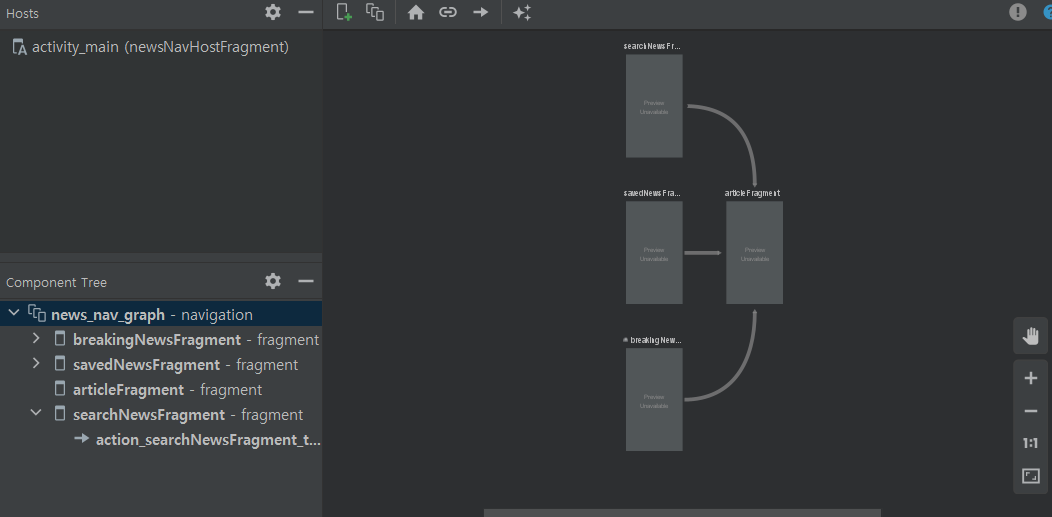
우리가 화면전환이 이 루어지기 위해서 Intent를 많이 써왔지만 레이아웃이 복잡해질수록 intent만으로 레이아웃 간의 상호작용을 표현하는데 어려움이 있습니다. navigation graph는 프래그먼트 끼리 어떻게 연결돼있는지 확인하고 연결할 수 있습니다.
fragment/frameLayout
내비게이션에 3개의 탭을 만들게 되는데 각 화면은 fragment로 구성하게 됩니다. 그리고 fragment들은 자신만에 layout이 있습니다. fragment를 쓰기 위해서는 frameLayout을 먼저 만들어줘야 합니다.
Dependencies추가
먼저 필요한 dependencies들을 추가해주겠습니다.
dependencies {
	implementation 'androidx.navigation:navigation-fragment-ktx:2.3.5'
	implementation 'androidx.navigation:navigation-ui-ktx:2.3.5'
}
Activity Main layout 만들어주기

activity_main
<androidx.constraintlayout.widget.ConstraintLayout xmlns:android="http://schemas.android.com/apk/res/android"
    xmlns:app="http://schemas.android.com/apk/res-auto"
    xmlns:tools="http://schemas.android.com/tools"
    android:layout_width="match_parent"
    android:layout_height="match_parent"
    tools:context=".ui.NewsActivity">

    <FrameLayout
        android:id="@+id/flFragment"
        android:layout_width="match_parent"
        android:layout_height="0dp"
        app:layout_constraintBottom_toTopOf="@+id/bottomNavigationView"
        app:layout_constraintEnd_toEndOf="parent"
        app:layout_constraintHorizontal_bias="0.5"
        app:layout_constraintStart_toStartOf="parent"
        app:layout_constraintTop_toTopOf="parent">

        <fragment //하단navigation button이 눌릴떄마다 해당 fragment가 보여집니다.
            android:id="@+id/newsNavHostFragment"
            android:name="androidx.navigation.fragment.NavHostFragment"
            android:layout_width="match_parent"
            android:layout_height="match_parent"
            app:defaultNavHost= "true" //host를 defualt로 지정
            app:navGraph="@navigation/news_nav_graph"/> //navigation graph를 만들어줍니다.

    </FrameLayout>

	//하단 내비게이션 바 생성
    <com.google.android.material.bottomnavigation.BottomNavigationView
        android:id="@+id/bottomNavigationView"
        android:layout_width="match_parent"
        android:layout_height="56dp"
        app:menu="@menu/bottom_navigation_menu"
        app:layout_constraintBottom_toBottomOf="parent"
        app:layout_constraintEnd_toEndOf="parent"
        app:layout_constraintHorizontal_bias="0.5"
        app:layout_constraintStart_toStartOf="parent"/>

</androidx.constraintlayout.widget.ConstraintLayout>
1. FrameLayout안에 fragment를 넣어줍니다. 아래 bottom navigation View를 클릭할 때마다, fragment가 바뀝니다.
2. fragment에 defaultNavHost를 true로 설정하면 activity에서의 뒤로 가기 버튼이 우리가 구현한 Navigation에 맞게 동작합니다.
3. app:navGraph="@navigation/news_nav_graph"/> = NavGraph를 연결해 줍니다. Nav graph는 xml설정 완료 후 자세히 다뤄보겠습니다.
4. app:menu="@menu/bottom_navigation_menu" = Bottom Navigation에 들어갈 menu를 넣어줍니다. 메뉴 만드는 법은 아래에서 다루겠습니다.
내비게이션에 들어갈 Fragment Layout 만들기
먼저 이렇게 빈 코틀린 클래스와 레이아웃 파일들을 만들어줍니다.
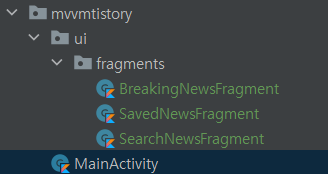

bottom navigation메뉴는 3가지를 만들어 즐겁니(breakingNewsFragment/ savedNewsFragment/ SearchNewsFragment).
각 메뉴에 해당하는 3가지 프래그먼트와 각각의 layout을 만들어주어야 합니다.
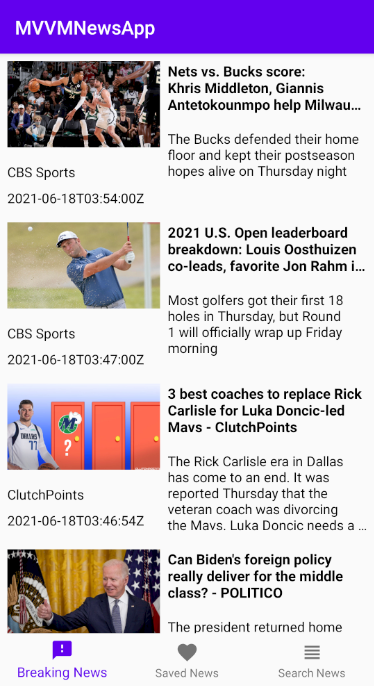
fragment에 들어갈 layout들을 먼저 만들어 주겠습니다. (아래 이미지는 이 강좌의 완성본입니다.)


res/layout/fragment_breaking_news.xml 생성
<androidx.constraintlayout.widget.ConstraintLayout xmlns:android="http://schemas.android.com/apk/res/android"
    xmlns:app="http://schemas.android.com/apk/res-auto"
    xmlns:tools="http://schemas.android.com/tools"
    android:layout_width="match_parent"
    android:layout_height="match_parent">

    <androidx.recyclerview.widget.RecyclerView
        android:id="@+id/rvBreakingNews"
        android:layout_width="match_parent"
        android:layout_height="match_parent"
        android:clipToPadding="false"
        android:paddingBottom="50dp"
        app:layout_constraintBottom_toBottomOf="parent"
        app:layout_constraintEnd_toEndOf="parent"
        app:layout_constraintHorizontal_bias="0.5"
        app:layout_constraintStart_toStartOf="parent"
        app:layout_constraintTop_toTopOf="parent" />


    <ProgressBar
        android:id="@+id/paginationProgressBar"
        style="?attr/progressBarStyle"
        android:layout_width="wrap_content"
        android:layout_height="wrap_content"
        android:visibility="invisible"
        android:background="@android:color/transparent"
        app:layout_constraintBottom_toBottomOf="parent"
        app:layout_constraintEnd_toEndOf="parent"
        app:layout_constraintHorizontal_bias="0.5"
        app:layout_constraintStart_toStartOf="parent" />

</androidx.constraintlayout.widget.ConstraintLayout>
res/layout/fragment_saved_news 생성
<FrameLayout xmlns:android="http://schemas.android.com/apk/res/android"
    xmlns:tools="http://schemas.android.com/tools"
    android:layout_width="match_parent"
    android:layout_height="match_parent">

    <androidx.recyclerview.widget.RecyclerView
        android:id="@+id/rvSavedNews"
        android:layout_width="match_parent"
        android:layout_height="match_parent" />

</FrameLayout>
res/layout/fragment_search_news 생성
<androidx.constraintlayout.widget.ConstraintLayout xmlns:android="http://schemas.android.com/apk/res/android"
    xmlns:app="http://schemas.android.com/apk/res-auto"
    xmlns:tools="http://schemas.android.com/tools"
    android:layout_width="match_parent"
    android:layout_height="match_parent">

    <EditText
        android:id="@+id/etSearch"
        android:layout_width="match_parent"
        android:layout_height="wrap_content"
        android:hint="Search..."
        app:layout_constraintEnd_toEndOf="parent"
        app:layout_constraintHorizontal_bias="0.5"
        app:layout_constraintStart_toStartOf="parent"
        app:layout_constraintTop_toTopOf="parent" />

    <androidx.recyclerview.widget.RecyclerView
        android:id="@+id/rvSearchNews"
        android:layout_width="match_parent"
        android:layout_height="0dp"
        android:paddingBottom="50dp"
        android:clipToPadding="false"
        app:layout_constraintBottom_toBottomOf="parent"
        app:layout_constraintTop_toBottomOf="@+id/etSearch"
        tools:layout_editor_absoluteX="0dp" />

    <ProgressBar
        android:id="@+id/paginationProgressBar"
        style="?attr/progressBarStyle"
        android:layout_width="wrap_content"
        android:layout_height="wrap_content"
        android:visibility="invisible"
        android:background="@android:color/transparent"
        app:layout_constraintBottom_toBottomOf="parent"
        app:layout_constraintEnd_toEndOf="parent"
        app:layout_constraintHorizontal_bias="0.5"
        app:layout_constraintStart_toStartOf="parent" />

</androidx.constraintlayout.widget.ConstraintLayout>
Fragment와 layout을 연결해주기
BreakingNewsFragment
class BreakingNewsFragment: Fragment(R.layout.fragment_breaking_news) {
}
SavedNewsFragment
class SavedNewsFragment: Fragment(R.layout.fragment_saved_news) {
}
SearchNewsFragment
class SearchNewsFragment: Fragment(R.layout.fragment_search_news) {
}
Navigation Graph/ NavGraph
각 프래그먼트에 모든 뷰를 연결해주었습니다. 이제 아까 다루기로 했던 navigation graph를 마무리해보겠습니다.
우리가 화면 전환이 이 루어지기 위해서 Intent를 많이 써왔지만 레이아웃이 복잡해질수록 intent만으로 레이아웃 간의 상호작용을 표현하는데 어려움이 있습니다. navigation graph는 프래그먼트 끼리 어떻게 연결돼있는지 확인하고 연결할 수 있습니다.
먼저 새로운 navigation 리소스 파일을 만들어주겠습니다.
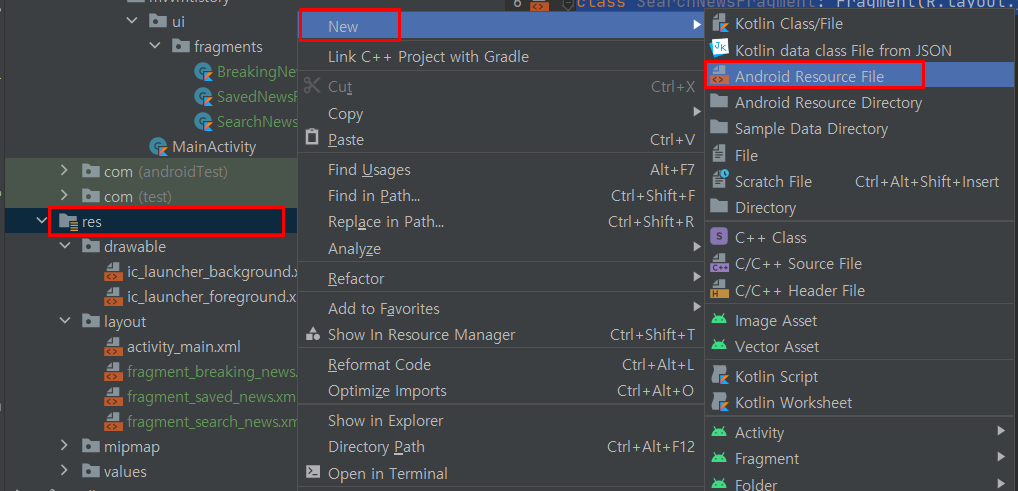
1. res 폴더 아래에 새로운 리소스 파일을 만들어줍니다.
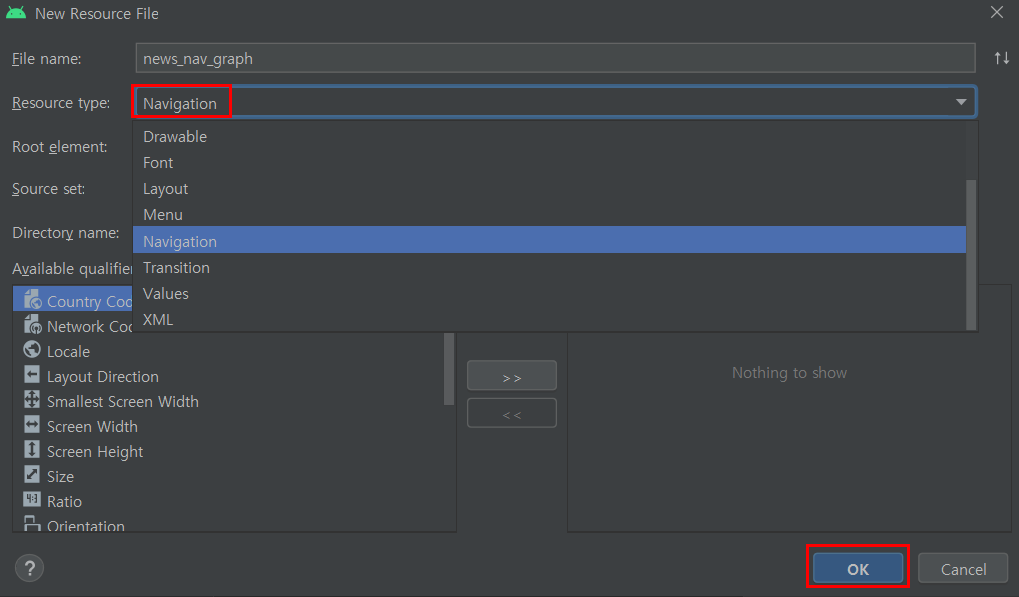
2. 리소스 타입은 navigaton입니다.
3. Navigation에서 designtab을 확인해보면 navHostFragment가 필요하다고 돼있습니다.

4. mainActivity에 fragment를 navHost로 지정해줍니다. 추가 후 프로젝트를 껐다 다 시키면 추가됩니다.
activity_main
<androidx.constraintlayout.widget.ConstraintLayout xmlns:android="http://schemas.android.com/apk/res/android"
    xmlns:app="http://schemas.android.com/apk/res-auto"
    xmlns:tools="http://schemas.android.com/tools"
    android:layout_width="match_parent"
    android:layout_height="match_parent"
    tools:context=".MainActivity">

    <FrameLayout
        android:id="@+id/flFragment"
        android:layout_width="match_parent"
        android:layout_height="0dp"
        app:layout_constraintBottom_toTopOf="@+id/bottomNavigationView"
        app:layout_constraintEnd_toEndOf="parent"
        app:layout_constraintHorizontal_bias="0.5"
        app:layout_constraintStart_toStartOf="parent"
        app:layout_constraintTop_toTopOf="parent">
        <fragment
            android:id="@+id/newsNavHostFragment"
            android:layout_width="match_parent"
            android:layout_height="match_parent"
            //추가시작
            android:name="androidx.navigation.fragment.NavHostFragment"
            //추가끝
            app:defaultNavHost= "true"
            app:navGraph="@navigation/news_nav_graph"/>

    </FrameLayout>

    <com.google.android.material.bottomnavigation.BottomNavigationView
        android:id="@+id/bottomNavigationView"
        android:layout_width="match_parent"
        android:layout_height="56dp"
        app:menu="@menu/bottom_navigation_menu"
        app:layout_constraintBottom_toBottomOf="parent"
        app:layout_constraintEnd_toEndOf="parent"
        app:layout_constraintHorizontal_bias="0.5"
        app:layout_constraintStart_toStartOf="parent"/>

</androidx.constraintlayout.widget.ConstraintLayout>
5. navGraph를 연결하는 법을 다루기 전 뉴스들을 클릭했을 때, 프래그먼트 위에 웹뷰가 나와서 뉴스를 보이도록 하려 합니다. 그래서 webview로 이루어진 fragment를 만들어 보겠습니다
fragment_article
<androidx.constraintlayout.widget.ConstraintLayout xmlns:android="http://schemas.android.com/apk/res/android"
    xmlns:app="http://schemas.android.com/apk/res-auto"
    xmlns:tools="http://schemas.android.com/tools"
    android:layout_width="match_parent"
    android:layout_height="match_parent">

    <WebView
        android:id="@+id/webView"
        android:layout_width="match_parent"
        android:layout_height="match_parent" />

    <com.google.android.material.floatingactionbutton.FloatingActionButton
        android:id="@+id/fab"
        android:layout_width="wrap_content"
        android:layout_height="wrap_content"
        android:src="@drawable/ic_favorite"
        app:fabSize="normal"
        android:layout_marginBottom="32dp"
        android:layout_marginEnd="32dp"
        app:layout_constraintBottom_toBottomOf="parent"
        app:layout_constraintEnd_toEndOf="parent" />

</androidx.constraintlayout.widget.ConstraintLayout>
ArticleFragment
class ArticleFragment: Fragment(R.layout.fragment_article) {
}
6. 이제 다시 res/navigation/news_nav_graph 디자인 탭으로 돌아갑니다. 그리고 우리가 사용하는 fragment들을 추가해줍니다.
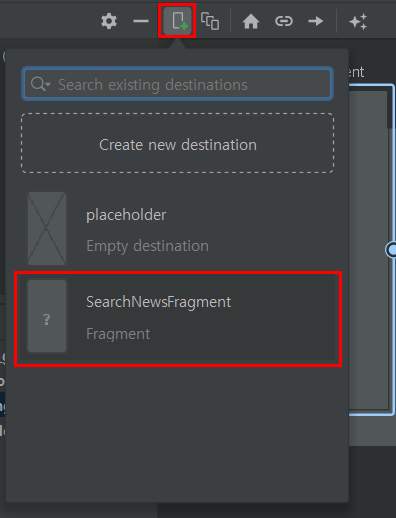
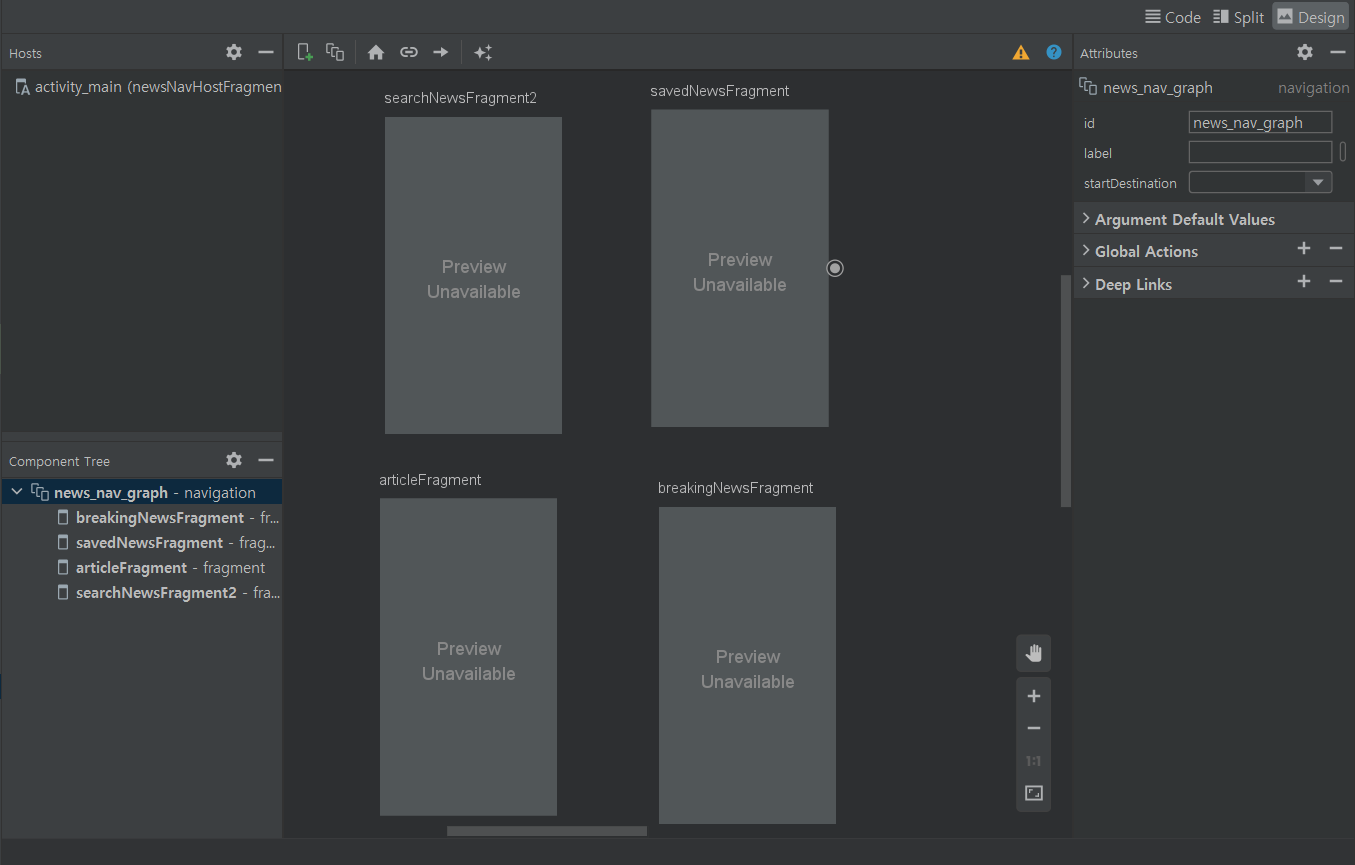
7. 이제 fragment끼리 상호작용을 위해 서로 연결해주어야 합니다. 먼저 각 프래그먼트에서 뉴스를 클릭했을 때 webview가 들어간 article fragment가 나와 야하기 때문에 , breaking news, search news, saved news, 프래그 먼트들을, article fragment에 연결하겠습니다.
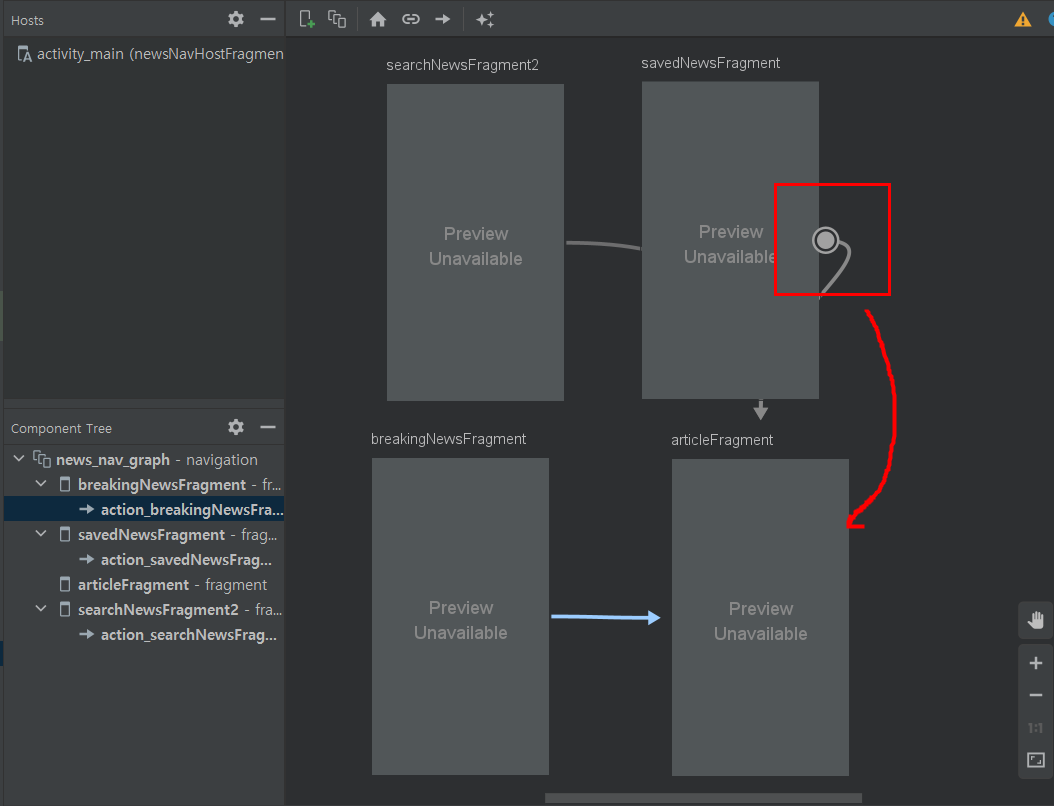
- 드래그하여 article fragment로 연결해줍니다.

- 위에 버튼을 누르면 자동으로 배열 가능합니다.

- start destination을 breaking News로 설정해줍니다. 위에 breakingNews fragment선택 후 집 모양을 눌러주세요. 앱이 처음 시작했을 때 보이는 fragment를 breakingNews로 설정됩니다.
하단 내비게이션 메뉴 구성하기
activity_main에서 메뉴를 적어주었지만 만들어주지 않았는데요, 이제 만들어보겠습니다.
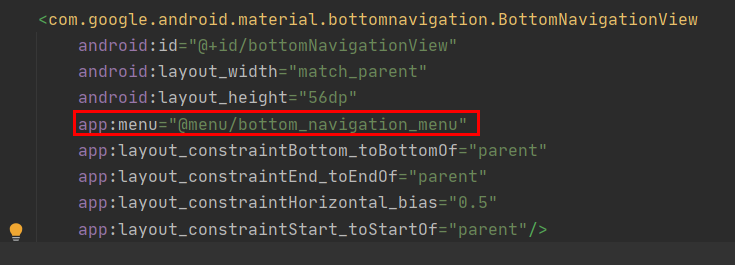
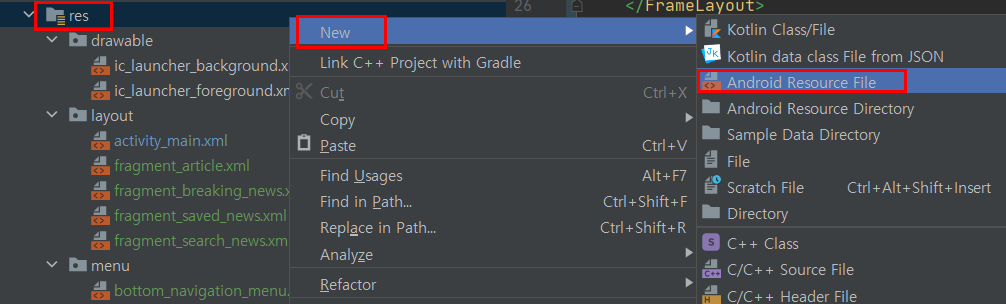
res폴더 아래에 menu resource파일을 만들어줍니다.
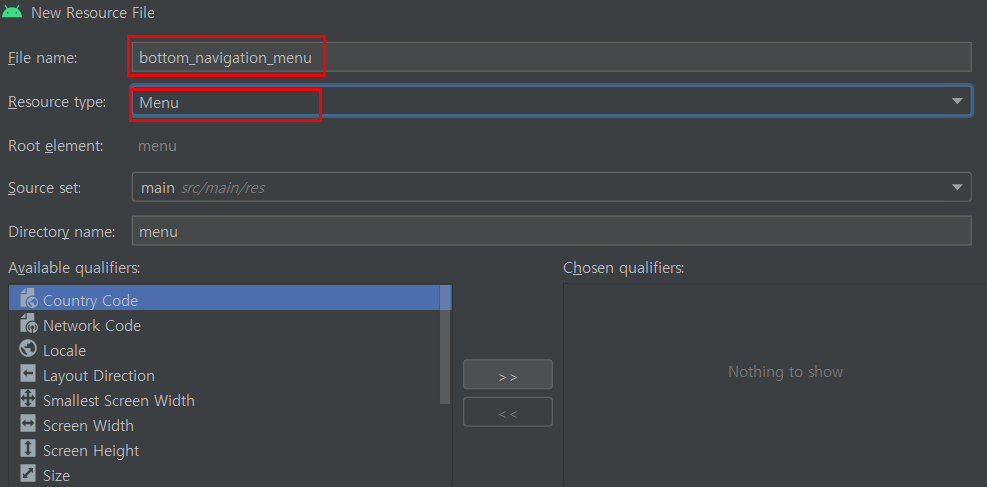
이름은 menu로 선택을 해줍니다.
아래와 같이 메뉴 구성을 하였습니다.
<menu xmlns:android="http://schemas.android.com/apk/res/android">
    <item android:id="@+id/breakingNewsFragment"
        android:title="BreakingNews"
        android:icon="@drawable/ic_launcher_background"/> //아이콘은 원하시는 아이콘으로 설정해주시면됩니다.
    <item android:id="@+id/savedNewsFragment"
        android:title="Saved News"
        android:icon="@drawable/ic_launcher_background"/>
    <item android:id="@+id/searchNewsFragment"
        android:title="Breaking News"
        android:icon="@drawable/ic_launcher_background"/>
</menu>
**메뉴 이름은 fragment의 파일 이름과 꼭 같아야합니다. **
MainActivity에 내비게이션 인스턴스화 하기
마지막으로 navigation을 mainactivity에 불러와주면 됩니다.
class MainActivity : AppCompatActivity() {
    override fun onCreate(savedInstanceState: Bundle?) {
        super.onCreate(savedInstanceState)
        setContentView(R.layout.activity_main)

        bottomNavigationView.setupWithNavController(newsNavHostFragment.findNavController())
    }
}
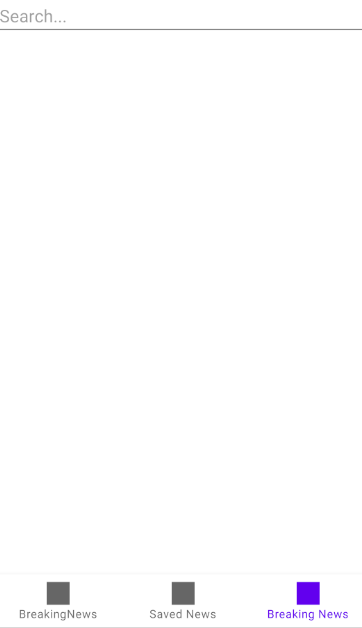
그리고 실행해보시면 아래와 같이 잘 작동되는 걸 보실 수 있습니다.